
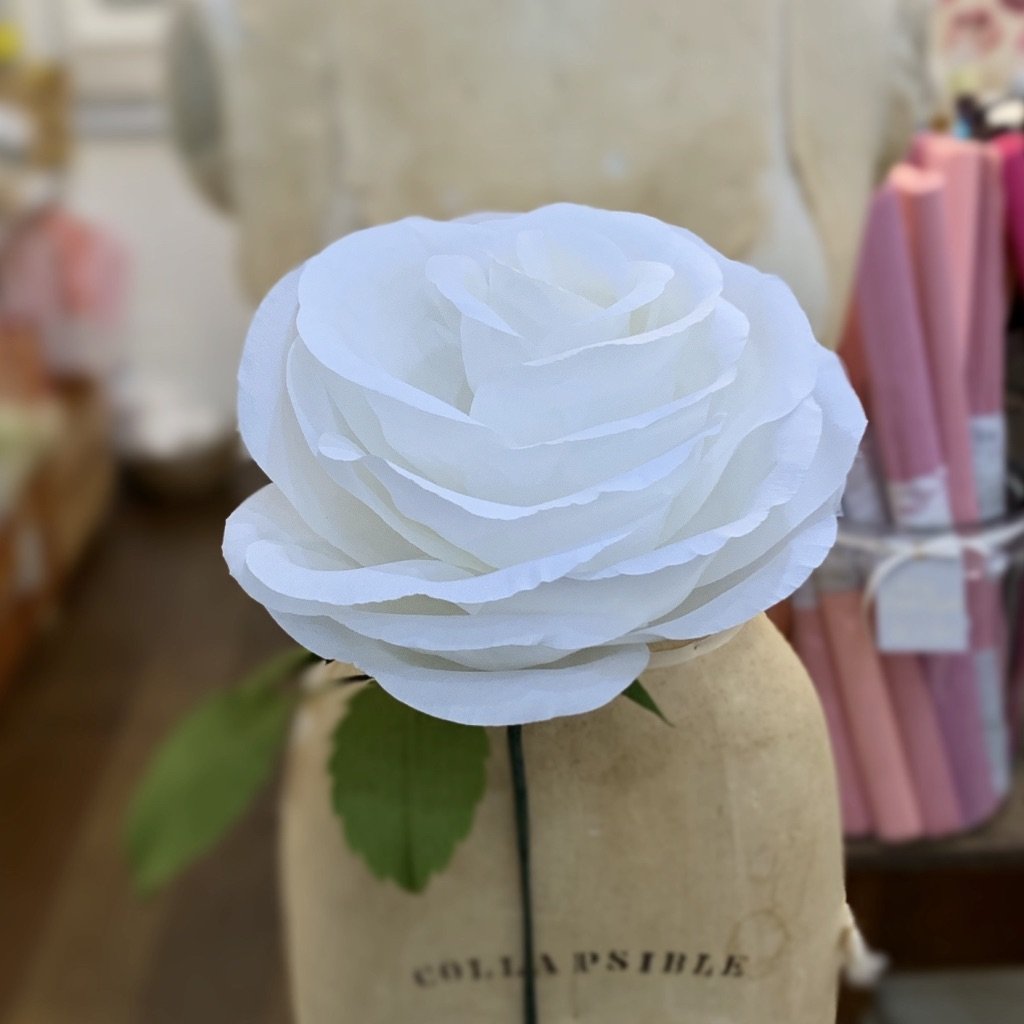
Giant Crepe Paper Rose
Let's make a giant Rose from double-sided, "Doublette", crepe paper from Germany. Why this particular paper? Let me tell you.
One way to be able to shape petals out of paper is to use crepe paper. Basically it's thin colorful paper that has been scrunched, or creased in one direction, giving it a "grain". Those crease lines are all running in the same direction. By pulling across this grain, we can create curves. Why double-sided crepe? There are various weights of crepe, but basically there is fine and heavy. Fine crepe, like Dennison's extra fine crepe is great for smaller scale and more delicate applications. Heavy crepe, sometimes called florist crepe, is good when you need support, or structure for your creation, but it has deeper crease lines and can look harsh. Doublette crepe from Germany is the best of both worlds. Using a magical process for combining two pieces of fine crepe, often two different colors, it still has fine creases but is sturdier and thus provides support for larger petals.
If you have purchased a pre-cut kit from us, you already have everything you need to make this super big Rose, except the Tombow tape runner. So get one of those or any other brand.
You can still make the giant Rose without the kit with the following:
3 folds of flower color Doublette
1 fold of leaf color Doublette
1 roll of green floral tape
6, 18" lengths of 16 gauge cloth covered stem wires
1 bundle of flower stamens
a 12" piece of thin wire, any color (if you are placing an order on our site, ask for some in the notes section)
a round pencil, dowel, pen or paintbrush handle you get the idea.
Place all the materials in the kit on a clean surface. Notice that you can see the different colored sides of the leaves and petals? Turn them over so all the same color is facing up. While making the Rose, keep the colors the same facing up. If you follow this advice, your flower will have the color that is facing up, on the inside of the Rose.
Straighten out the wires as best you can.
Assemble the stamen and leaves first.
If you purchased the supplies separately, separate the full bundle of stamens into 4 piles. Take one of those piles and fold the 12" piece of wire around the middle of the bundle, fold the wire in half so that there is a 6" stem. Twist the wire tightly a few times. If you have our kit, this has already been done for you.
Next, wrap the end of the floral tape around the bottom third of the stamens as in the photo. Floral tape is waxed crepe paper in a roll. It works with the heat from your hands which causes the wax to melt and stick to itself. Once you get this concept, you will be able to tackle the rest of the flower. Floral tape is very forgiving, if at first you struggle, just keep going, you'll be a pro soon.
Roll the floral tape at an angle covering half of the length of the wire.
Place one of the green stem wires against the thin wire. Wrap them together with floral tape until the thin wire is covered. Tear or cut off the tape.
Place 2 more green stem wires together with the one with the flower stamens. Wrap them all together with floral tape all the way to the ends of the wires. Tear or cut off.
Fold each leaf in half and crease with your finger, unfold the leaf. Notice the crease? This is a line to help apply the tape. If you are new to tape runners, let me explain, they roll out tape adhesive, not the plastic tape. It's like using double-sided tape, but with the dispenser it's a lot easier. The Tombow runners have a trap door on the bottom and ridges on the top. Make sure you are holding the runner with the bottom down. Press and glide the runner over the crease line on each leaf end to end.
Lay one of the remaining 3 green stem wires on top of each taped leaf. Fold the leaf again, this time with the wire inside. Press together along the folded edge to help the adhesive stick.
Unfold the leaf and flatten the encased wire to one side. Slightly bend the leaf back. This will stabilize the leaf so it stays open and flat. Complete all three leaves this way.
Wrap the bottom of each leaf with floral tape, covering the crepe paper at the bottom of the leaf. Diagonally wrap one of the leaves about 3 inches down the wire, the other 2 wrap only about an inch down with the floral tape.
Bend one of the leaves with 1" of tape sideways to the right, bend the other to the left. Arrange all three leaves so that the straight leaf is in between and 2" higher than the 2 bent leaves, make sure they are across from each other.
Wrap floral tape under the bent leaves to about half way down the three green stem wires.
Bend back about 2" down from the lower leaves. Set aside.
Now for the fun part.
Start by holding one of the small petals at the widest part of the petal. Pull and slide with your thumb creating a concave line across the petal almost to the edges.
Move your thumb and fingers directly under where you were, pull and slide again, just not as close to the edge this time.
Hold the pencil across the top of the petal edge and roll the paper around the pencil, sliding and slightly pulling as you go across the entire top of the petal.
Do this to all the petals, including all 15 of the large petals. Set aside in piles, all face up. This will take a while.
Now that you have shaped all your pretty Rose petals, we can finally assemble them into a large flower. Take your time. Breath in, exhale. .....
Starting with the small petals run a line of adhesive about 3" up from the bottom and down, in the center of each small petal.
Place the flower stamen with wire on the center of the first petal so the stamens are just below the curve, see photo. Scrunch the paper, about 3" up from the stem. Try to keep the excess paper rolling inward, yet not wrapped fully around.
Place the second small petal against the first so that it covers about half of the first petal. Scrunch the bottom of the petal as you did the previous petal. Don't let go of the forming flower center. The adhesive will help hold the petals in place, emphasis on the word help, not totally hold.
Place the third petal overlapping the second and first petals, scrunch tightly together as before.
Tightly wrap floral tape, 3" up from the bottom, did I say tightly? Yes! It can get tricky here, just keep trying. Once you get it going, it's all good. Wrap that floral tape all the way to the bottom of the flower paper, tear or cut off. Yay, you completed your first round!
Let's keep going.
You should have 2 small petals left. I like to work in 3's so you will need to apply tape adhesive on one large petal for this second round. Apply 2 rows to the large petal. Keeping the bottom of the petals meeting the previous round, and starting with the small petals, go around again in the same way as the first round, ending with the large petal.
Tightly wrap with floral tape about 3" up from the bottom of the petals.
Repeat rounds using 3 large petals at a time, really scrunching the bottoms of the petals to the center of the petals, moving around the forming flower in a spiraling half petal at a time. Get it? Check the top of the Rose from time to time when placing the petals, rearrange if necessary.
Overlap the previous petal, moving in a spiral all around the flower. It's going to get a bit unruly, but hang in there, it'll be gorgeous.
Make sure you completely cover the flower paper with each round. This will really help the structure of the Rose.
When you get near the end of your petals, you will notice there are lines forming on the petals already attached. You can take the time here to smooth them out by pulling across the bottoms. It will look much neater.
It's time to finish off the Rose with it's calyx. Start by stretching just a bit at the wide part between the spikes.
Apply some adhesive tape to the bottom centers of each spike.
Turn your Rose upside down on your surface, don't squish it. Arrange the calyx around the stem, gathering it up to fit. The inverted points should just meet the Rose.
You should be totally proficient with floral tape at this point. Wrap that calyx tightly and cover it completely.
Perfection!
Remember those leaves we made a while back. Aren't you glad they are done? Hold the bent stem against the rose just a little bit below the Rose hip (ha, we have one now!).
Wrap your last twirl of floral tape, all the way down to the bottom of the stem.
Wala! You did it! Take a bow. I'm so impressed.
Now go make some more.
xo
mi
2 comments
Hi Magnolia,
We sell them in the shop for $45 each, you could do the same for even more.
Best of luck to you!
Hello, Magnolia here.
Am interested in selling these roses after I make them. How much would one sell for? I plan on making a profit. Help plz!